
Happy Birthday, Esther and Ashton!
Be sure to check out the link to Esther's writing under Artists and Authors in my sidebar.
I've had such a time getting my pictures to post, and had to unplug my computer due to thunderstorms at various times. Today is a sunny day, and I hope the tech things are working better today.
Be sure to check out the link to Esther's writing under Artists and Authors in my sidebar.
I've had such a time getting my pictures to post, and had to unplug my computer due to thunderstorms at various times. Today is a sunny day, and I hope the tech things are working better today.
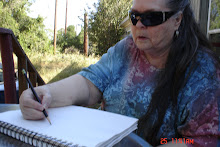
Ashton and I have made some examples, which I have scanned to show as steps in the process of making this project.
I have an old photo (above) that shows the Mock Stained Glass Windows displayed in one of my old art rooms. You can tell it is old. Check out the bell bottoms and "natural" blouse! That was a wonderful room for art-huge, wonderful big windows, and you could not hurt it. But, it took a lot of strength to get the windows up in hot weather, and sticks to hold them up. It was freezing in the winter with the heater almost to the ceiling, burning up under a tin roof in hot weather, no shelves etc, few art supplies, and I stayed sick from the years of dirt and grime ground into the concrete floor of the old ag shop, and the open drain in the floor. Still it could have been a great place to work. It was sad that, instead of fixing it up a bit, it was divided up into 3 classrooms. Glad I got to move to another school and didn't have to be confined in that small space. At least they kept the windows.
I have already given the steps for creating this project in the previous post, so, I'm going to add these photos as a slide show, which may make for another post.
I have already given the steps for creating this project in the previous post, so, I'm going to add these photos as a slide show, which may make for another post.
We ran into a small problem when we were glueing our pieces of tissue paper onto the back of the windows. My glue bottle kept clogging up, so I opened it with an unbent paper clip. It still clogged with little blobs of thickened glue. I cut the hole larger, and then too much glue poured out. We didn't have waxed paper to put under our projects, so we used empty soft drink cartons, the waxey side, and parchment paper. The parchment paper rolled too much so, if I used that again, I would tape it down to a work surface.
We solved the glue problem by putting a small amount of glue onto the drink carton, then used stirring sticks, I used plastic and he used wood, to dip out the glue and apply it to the construction paper. (That is really a slow way to glue things!) Then we placed tissue paper on top.
The glue leaked through some, so we lifted the projects and let the glue dry a bit, then placed them on top of some empty aluminum soft drink cans to finish drying. In class, we could hang our projects with clothespins from string draped across the room to dry, or, we had a drying rack for larger projects. At home, we had to experiment a bit.
I tried a different design using a star and made one window with one solid sheet of tissue paper in the back, just to show how that would look. A lot of students liked to do that as it was easier and faster. Some would put strips of tissue paper rather than cutting out the individual shapes. That really didn't capture the idea of stained glass, though. We were doing these to create a project that was colorful, could be displayed, and taught a bit of how stained glass was made, and was still inexpensive. It would have been nice if we could have used real stained glass, caming, and things that go into stained glass work. But that was not possible in a class with a tiny budget.
I thought that these always came out well and added a lot of color to our room. Especially in those big ag shop windows! And, those who we gave them to really appreciated them, too.


No comments:
Post a Comment