 Angel From A Crystal Star
6" x 8"
block print
Summer vacation is just a few days away. At least school is out here for the students on Thursday. I guess that I should have posted this project during school time, but, maybe, if you are looking for a Vacation Bible School project, or something for your kids to do at home, this one is pretty simple and kids seem to like it. Teachers may find this useful for another school year.
Personally, I don't think that I have the patience to do a long printmaking project with traditional materials, so this worked great for students, and for me. I have done the more traditional, longer methods, but it is not one of my favorite things since it really tries my patience.
Materials
1. old newspapers to cover work surface
2. pencil or ball point pens (old pens that no longer work are best!) You can even use a nail, or anything that has a point that you can cut into styrfoam with.
3. styrfoam trays (like the ones that are used to put meat , tomatoes, etc. on at the grocery stores. ) I made friends with the butcher who let me have a good supply of these for students, and also you might be able to buy them for a small cost. I've also seen them offered in art supply catalogues from time to time. They work great for palettes, and other things too!
4. Scratch paper
5. Brayer (you could also use a spoon or other old object for applying the ink)
6. Rolling pin (an old wooden rolling pin would be best. You don't want to use a rolling pin that you would later use for cooking! )
7. Block Printing Ink (your choice of colors) I like to use the water based Speedball Block Printing inks. Starting with one color on one design as I did above is the easiest.
8. Block Printing paper
I like to use Speedball Block printing paper, but you can use anything you like or might have. Even a heavy paper towel! You just want to be careful to avoid using a paper that is so fragile that it will tear, or one that is so thin that the ink will go through easily.
9. Paper towels and something like Wisk, hand soap, Windex, or even Amway's LOC to clean up with.
10. Scissors
11. (optional) If you have some kind of rack to place the prints on while they dry, that would be good. If you don't have a special drying rack for pictures, you could use something like an old shelf from a closet, one of those metal affairs, a plastic milk crate-the box type with the holes in it, or you could even hang a clothesline away from traffic, and use clothespins to hang the prints. Drying time isn't all that long, if you use the water based inks. Usually they are ready the next day.
Procedure
1. Use scratch paper and pencil to draw your design and plan. Remember that all letters and numbers have to be backward or, when you print, they will look like you are looking in a mirror!
2. Cover your work space with newspapers and gather all materials.
3. Trim the edges or lip off your styrfoam tray (plate)
4. Draw your design from the plan onto a styrfoam tray. (plate)
5. Once you are sure of your design, use pencil, pen, or other tool to deepen the lines in your plate. Some lines may also need to be wider. Varying the lines makes them more interesting.
Be sure that you don't press too hard or you will go all the way through the styrfoam, leaving a hole. If that happens, work with it, and make something out of it. Or, you may want to start over.
6. Use a seperate styrfoam try to put your ink in. Squeeze out some on the stryfoam tray, then spread it out fairly evenly with a spoon or your brayer. You don't want it too deep or too thin.
You may have to test your brayer in it, then spread that on some scrap paper in order to know just how much ink to use.
7. Ink your plate. To do this, use the ink of your choice on your brayer and cover the plate (design on styrfoam tray) with an even coat of ink.
8. Print. Place the inked plate on the block printing paper. Try to center it, leaving a nice border, depending on the size of your plate and the paper. Also be careful to not wiggle the plate once it has been placed on the paper.
9. Roll. Apply gentle, smooth pressure by rolling the rolling pin, or a spoon, over the plate. You can protect your tool by using some newspaper on top of the plate. That will minimize any paint that might come out from under the plate.
As an alternative to the rolling pin, you can use a spoon and just rub, in a circular motion, over the plate. You do want to be sure that all of the areas on the plate have touched the paper, evenly.
10. Pull the print. Carefully pull the plate away from the paper. It should be a bit sticky. Pull from one edge out, slowly.
11. Hang the print to dry.
12. Once the print is dry, use a pencil under it to write the title in the center, your name on the left, the date and print number on the right.
13. If you desire using more colors in a print, you will need to make a seperate plate for each color. This becomes a bit more complex, but will work just fine, once you plan your design, and have done a simple one color print to understand how printmaking works.
Another thing that you can do is to add touches of color with a brush and acrylic paint, watercolors, or any medium that you would like to use, depending on what you are trying to create.
14. You can use this technique to make cards, book plates, pictures, stationary, etc.
15. To clean up, I like to use Wisk, or Amway's LOC, and Windex. That is for tables and brayers. The water based ink should come off hands with just soap and water.
In my design above, I was demonstrating this for a class. Somehow, a hole appeared in my plate, so I decided that I could use this for a Book Plate, and just leave that area blank. I planned to use calligraphy to fill in my name, book title, or whatever I wanted to add later.
This is one of my drawings of girls that I have always liked to do, but this one was done as a print, with black ink.
Once a color has been used on the tray, it can be washed off, dried, and another color can be used. They can be reused as long as desired, as long as the tray doesn't crack from too much use or pressure.
If you should decide to use oil based block printing ink, you will also need solvents to clean your plate and equipment. Look at the tube of ink or check out what is recommended for use with oil based inks. After using the oil based things, I still use my usual cleaning products to remove the solvents from tables and tools. You will also need to see if you can use them on styrfoam, as that may make your plate dissolve! Test out a little on some styrfoam scrap, or you might just opt to use a piece of wood or linoleum for printing. And that is going to involve a few more tools than I have listed. A pencil or pen won't be strong enough. But, that is another project.
****************
I hope that you enjoyed this project and will join my mailing list!
Please sign my Guest Book at the bottom of the page.
***************
Stork Watch
I have added another link to a stork cam, this one has sound and can be enlarged to full screen. You can hear the storks making noises, as well as background noises of the area. This one is in the Przygodzice nest. There is another link to it, too, that I have been watching, but it doesn't have sound.
Sadly, we seem to have lost one little baby stork, as there are only four now. But those left are really something to watch. One baby, especially, is very active, and seems like he is going to start running or flying as fast as he can!
The Ustron nest that we watched so much last year doesn't seem to have but one adult stork, still, and no eggs. This is the one where all the babies died. Maybe the parents knew that there had been illness there, or they were sad from losing their babies. The nest was cleaned, sanitized, etc. to make it safe for the storks this year. Maybe that was just too much human contact and the storks won't come back there.
I don't know. I grew up hearing that, if you touch a bird nest, or a baby bird, the parents would not come back, or wouldn't take care of the baby anymore.
Maybe that was a story that adults told us to make us leave bird nests and wild things alone, or maybe it is true.
Perhaps something happened to one of the storks, or both. Maybe they decided to start a new home elsewhere. Maybe they got a divorce and moved on. I don't have any idea, but we have been discussing them a bit on a Polish genealogy list. Lots of people enjoy watching the storks.
I hope that all the babies stay well and will fly off safely into their adult lives, when that time comes.
************************
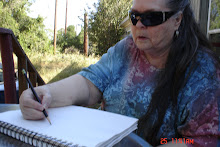
Sketch Crawl
Look at the top of my page, in the sidebar, and notice the link that I have added to Sketch Crawl. You can now click on their logo and go to the Sketch Crawl web site.
I hope that everyone will join in!
If you are in this area and want to be a part of the Sketch Crawl on June 21, let me know! I hope that we can "Draw the Brazos Valley" and get a lot of participation that day.
Look under Bryan/College Station under Forums for the 18th and 19th Sketch Crawls and you will find me there. You can register and add a note there under my post, or you can register yourself.
If you are in a different area, you can register there, too. Start a group from where ever you are, if you want. Just plan to sketch that day, for at least a little while. And let someone know about it, probably on the SC site, or let me know. Groups, solo, families, beginners, students, adults, professional-anyone, anywhere. And, remember, it is FREE!
**************************


No comments:
Post a Comment